Showing posts with label colour. Show all posts

Tuesday, 22 October 2024

Colouring Criteria

This past week, the students were introduced to the word criteria 

As a class, we created criteria to follow when we are drawing, colouring or illustrating.

Using a familiar picture from our most recent religion lesson, students put the colouring criteria into action! 

Students were sure to check our colouring criteria to ensure their illustrations were amazing. Next week we will be writing and illustrating our very own Halloween stories, so this colouring criteria will help us become successful illustrators! Stay tuned!

Wednesday, 7 December 2022

Colour!

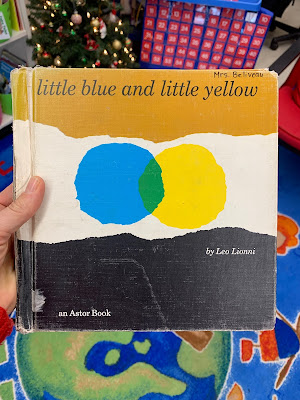
This past week in Science we began a unit on colour! Much of our learning begins with a book, and this was no different. We started with an oldie, but a goodie! This gem was published in 1959!


We made viewfinders using three transparent circles in red, yellow and blue, and experimented with these colours. The viewfinder helped us discover how the colour wheel works. 


We enjoyed a super catchy song about the primary colours!


We will continue to explore colour by adding white, black, and water to a colour . Stay tuned!

Tuesday, 26 January 2016

An Explosion of Colour!

Just when you thought Grade 1 couldn't get any messier, we began a Science unit all about colour!

Sometimes class is SO much fun, the kids don't even know how much they're learning! Using a paper plate, we blobbed two primary colours on top, put a paper clip on, and using a magnet below were able to move the paper clip to mix our colours!


After colour mixing, we posted what we learned about "primary" and "secondary" colours!

This little tune had us all jammin' to some sweet beats...


Then we tackled some hefty vocabulary and examined many items to see if they are transparent (see through) or opaque (not see through). 


Check out all the samples!

Click to play this Smilebox slideshow


And that was just the tip of the iceberg! So many more messy, hands on experiments to come! Get the wet wipes, here we come!


Thursday, 29 January 2015

Creating Colour: The Sequel!

We have learned so much about color already, and yesterday we welcomed in 5 very brave and energetic moms and dads to help us learn even more!

The parents were tasked with running 4 messy, hands-on centers!


Station One: Adding Water to Paint
First up? Adding water to brown paint! Can you guess what happened?
As we added water, the paint became thinner, and it was easier to see the bear outline beneath. The paint became more transparent!

Station Two: Adding White
Then we added white paint to the primary colours. The kids loved seeing the paint get lighter each time more white was added!

Station Three: Adding Black
We added black paint to the primary colours, and many predicted the colour would get darker! Great prediction, scientists!

Station Four: Colour Mixing

We had some fun rolling, squeezing and squishing plasticine! It was a great review of the primary colours and how they combine to make the secondary colours. 

So much fun! 

Next Wednesday, February 4th will be a small review quiz for this unit. To help your child prepare, our experiment sheets have been sent home in this duotang with your child today, along with a helpful study guide:

Consider reviewing this blog post with your child, as well as this other one from a few days ago!


Wednesday, 28 January 2015

Creating Colour

We have been hard at work with our Science Unit, Creating Colour! 


We made predictions about what would happen when we mixed red, blue, and yellow with each other. Then, using a paperclip on top of a paper plate and a magnet beneath it, we were able to mix these three primary colours, mess free!


Look at our results:


Here is a ridiculous YouTube clip we enjoyed which reinforced what happens when we mix primary colours (be VERY careful, the song gets stuck in your head!)


Then we posted what we had learned on the wall:


This week we tackled two enormous words, TRANSPARENT and OPAQUE. Can your child describe the difference?

Look at the items we gathered:


Then we examined over 20 samples and practiced identifying if they were transparent or opaque. The boys and girls looked at everything from ketchup to shampoo! 


But this was just the beginning! Our messy morning of colour centers was fast approaching! 

Stay tuned for our next blog post, Creating Colour: The Sequel!


Monday, 4 February 2013

Sunshine and Rainbows

Today Grade One was all sunshine and rainbows!

It was a fabulous day! As the children arrived, they figured that the groundhog did not see his shadow this weekend. The sunshine was streaming in our windows and the morning felt so warm and balmy. Spring is on the way!

We are nearing the end of our Creating Colour Science unit, and to celebrate, we decided to enjoy some rainbows ... in our bellies!

Our Snazzy Snack this month was Rainbow Cupcakes! Can your child retell the steps we followed to make them?

We began by taking white cake batter, dividing it into six bowls, and dyeing the mix with food colouring. 


Then, children scooped a bit of each colour of batter into a muffin cup. 


We popped our colourful creations into the oven, and in no time, we were eating delicious rainbows! Way to go, chefs!


After our bellies were full and our fingers wiped clean, we spent some time listing ingredients and sequencing the steps, allowing opportunities for several little phonics mini-lessons sprinkled throughout. Another great recipe into our cookbooks!


Don't you love how the cupcake has yellow beams coming out of it?
They were really that good!


Great One really is sunshine and rainbows!


Special thanks to Peonies and Poppyseeds for the wonderful Rainbow Cupcake recipe we used today! 


Monday, 28 January 2013

Exploring Transparent and Opaque

Today several of our classmates were away, but that didn't stop us from doing some serious learning!

In Science we have been enjoying our Creating Colour activities, and today we examined transparent and opaque. Transparent means something is see through. Opaque means is it not see through. The children observed several different samples today and decided if the sample was transparent or opaque. Some were pretty challenging!

For those who were away, here are the samples we observed. Please take some time to flip through and decide if each sample is transparent or opaque:


You may have noticed there was no #5 ... it was going to be chocolate sauce, until Mrs. Beliveau, for some unknown reason, didn't have any left in her pantry!

We had a wonderful afternoon and learned so much together!

Thanks to Ms. Kuchmak for sharing this activity with us. Great observations, scientists!


Thursday, 24 January 2013

Creating Colour Centers

Our classroom could be called busy on an average morning, so we might call yesterday morning exhilarating!

We have recently begun a Science unit exploring colour, and yesterday we got a little messy as we experimented with a variety of colour mixing activities! Our morning was centered around several of the following I can statements:


We welcomed in seven volunteers who bravely led the students through the hands-on experiments. Here is a glimpse of what we were learning!


Colour Centers in the Kindergarten room!


Students were given balls of plasticine in primary colours; red, blue and yellow. They squished and squeezed the plasticine together to create secondary colours; purple, green and orange. Can your little scientist remember how to make purple? Orange? Green?


Mixing primary colours


Using primary coloured paint, students predicted what would happen if white paint was added. They added a drop of white paint for each descending circle. Can you see the colours getting lighter?


Adding white to a colour


We also tried adding drops of black paint to the primary colours, and were not surprised when the colours got darker.


Adding black to a colour


We experimented with adding water to a colour. We began painting over a bear-shape with regular brown paint. Uh, oh, we couldn't see the bear anymore! We added a few squirts of water, and painted over the next bear. We repeated this process a few more times, and observed that the bear-shape could now be seen! The paint became thinner with water. When we painted the first bear, the paint was opaque (not see through). When we painted the final bear, the paint was transparent (see through). 
Adding water to make the paint transparent


We also enjoyed the challenge of putting paint chips in order from lightest shade to darkest.


One of the favourite activities of the day was making rainbow snowflakes! Students decorated coffee filters with water-based markers, gave them a few squirts with water, and let them dry. A few folds and a few snip-snips later, and we had a wonderful RAINBOW BLIZZARD in our hall!
We're tired of winter weather, So cold and wet and white,
We talked to Winter's Wizard, He made a Rainbow Blizzard!

Next week we will explore transparent and opaque in more depth. For now, we all need a good hand-washing and an even better rest. 

Thank you, helpers!